AiCut Studio Manual
Applies to: Studio (browser version / desktop version). This manual is about how a person cuts a film in Studio; to have an agent make one, tell it to run
aicut. The film format itself is in packages/AiCut/SPEC.md.
Contents
- What this is
- Before you start
- The project library
- A tour of the interface
- A few words
- Playing and looking
- Media
- The timeline: cutting
- The timeline: tracks, marks and views
- The picture: changing it in the preview
- The shelves: text, stickers, effects, transitions, filters, templates
- The inspector
- Sound
- Subtitles
- Version history
- Layouts and workspaces
- The AI chat
- Export
- Settings
- Every key
- The command line
- When something is wrong
- What a film's folder looks like
1. What this is
AiCut is for making films with a coding agent. Studio is the editor in it: a local program on your own computer, opened in a browser.
A film is a folder with a film.html in it. That file cuts three kinds of thing together along tracks:
- Pages: a web page with a
frame(t)function that draws what the film looks like at second t. Animation, three.js, CSS, SVG, canvas, any of it. - Videos and pictures: the files in
assets/. - Sound: music, effects, voices, each its own clip.
Every change you make in Studio is written back into the film's files, so the agent can see it and will keep it.
A few things worth knowing:
- No account, and nothing is uploaded while you make, cut or render.
- Keys stay on this computer. They are only needed when you want voice-over, music, pictures or video generated, and then only for your own service.
- The truth of a film is its files, not a database inside Studio. Delete Studio and the folder is still there.
2. Before you start
| You need | Browser version | Desktop version |
|---|---|---|
| Node 22.2+ | yes | included (nothing to install) |
| ffmpeg | downloaded on first run (about 50 MB; an installed desktop version lends its own) | included |
| git | needed for version history | needed |
| A headless Chromium | downloaded on first run (about 100 MB) | included |
The desktop version is Studio with a chat window beside it and an agent in it; the browser version is driven by your own coding agent (Codex, Claude Code, and the like).
3. The project library
Studio opens on the library: every film on this computer.
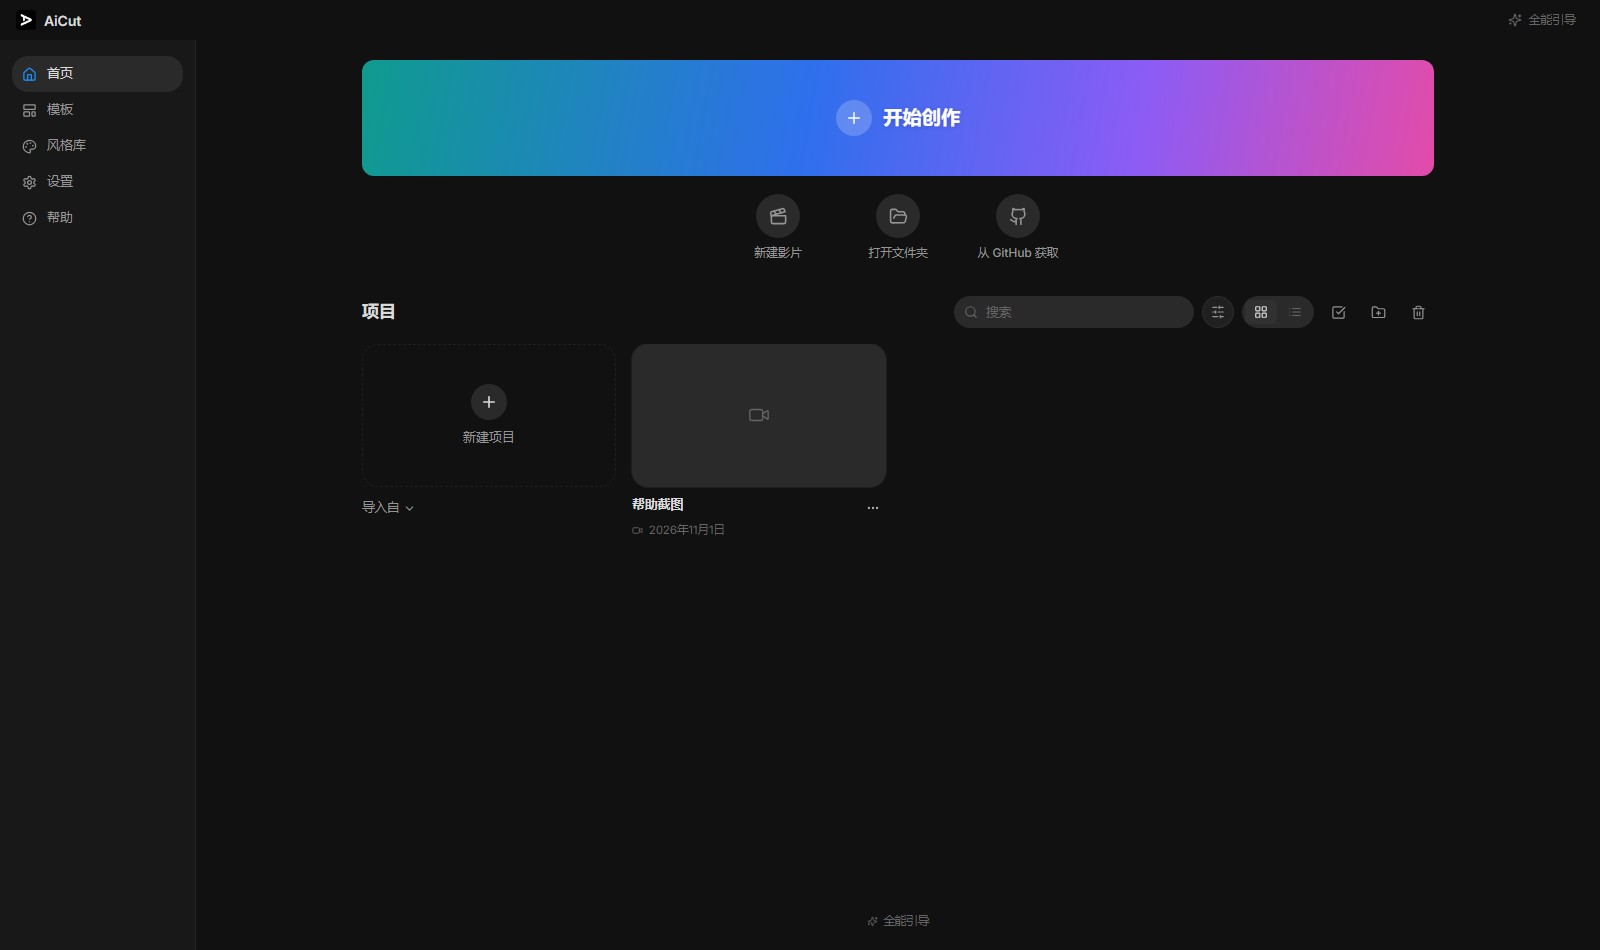
- New project: one press makes an empty folder (with a fresh
film.htmlin it) and goes straight into the editor. No panel, no name to type. If you want a film that already has skills, or a picture on screen at once, take a starting film from Templates. - Templates: eight starting films in the left column — a title, a chapter page, a quote, a lower third, a data page, a follow card, a vertical cover, an end card. Each one is a whole film (
film.htmlplus the page it needs), so picking one gives you a picture that draws itself, with words and shapes you can change. There are no styles here: a whole visual language belongs to the style library, templates only decide what shape a page has. The Templates tab in the editor holds the same eight — same cover, same name — and puts its lines at the playhead. - Style library: the left column's style library lays out the one hundred and fifty-three archived styles that come with
aicut-motionas a wall of real covers, filtered by twenty-five families and searchable by name or number (say026). A press opens that style in a panel: the skill's own preview page — the first eighty-six draw a real picture fromcode.jsandt, the next sixty-six are a whole short film playing its own code, and the last is the whiteboard pen line, showing the film that pipeline rendered. New tab at the top right opens the whole page. They are not templates: opening one shows you how it moves. To make a film, say what it is about and the agent will pick three, lay them out as cards and let you choose. Skills you have opened on the Skills page come first on this wall (your styles); those cards can start a film — one press makes a project in that palette. - Skills: the left column's skills page lists everything this app can hand an agent (the built-in
aicutandaicut-motion, plus whatever was fetched from a repository). Each row has one Chinese line saying what it does — the skill's owndescriptionis a whole paragraph written for an agent, and hovering that line shows it as written. The switch on the right decides whether the skill is also a style: on, the style library gains a card drawn in its palette (a real picture, not a swatch), and projects started from it carry the skill; off only takes the card away, the skill stays. Theowner/repoat the top fetches a repository's skills — fetched skills are only listed, they do not become style cards by themselves. A skill of the same name as a built-in one loses: the page says the app already has it. The bin at the far right of a row deletes the skill: it asks once, and then removes it from disk (a fetched one from~/.aicut/skill-library, a built-in one fromskills/in the install folder), taking its style card with it; copies already inside projects stay. The app's own two —aicut(the manual an agent reads) andaicut-motion(every starting film carries it, and the hundred-plus styles live in it) — cannot be deleted, and hovering says why. Skills you keep yourself live in~/.aicut/.pi/skills/<name>/SKILL.md; they are listed here and can start projects too — an installed version has no repository beside it, and the director skill (Hypit's manual, licensed elsewhere, not shipped with AiCut) depends on that copy: while it is there, the upload a video card on the start page is the director's door. - Open folder…: any folder with a
film.htmlopens; if there is none, Studio asks whether to start a film there. - From GitHub…: paste a repository, or a folder inside one, and Studio copies it into your library (without its git history — the copy is yours).
- Examples: the official examples, one press to open.
- Drop a folder in: it opens as a project.
The list searches, sorts (recently opened, newest, oldest, longest, name), switches between cards and rows, takes several at once for deletion, and can keep folders.
Everything a project is (the film, its version history, the chat, the logs) lives in that folder. So delete moves the folder to the bin — and you can take it back out. If you have already moved or renamed the folder, the project says folder not found; you can remove it from the list, or point it at the folder again with Locate….
When it will not delete (that folder is in use), something still has it open: the project's chat, an export, or another program using a file in it. Close that and try again; if it still will not go, restart AiCut. A folder on the same disk as Studio is moved into
~/.aicut/trash; one on another disk goes to.aicut-trashbeside it — not a file is lost, and you can take it back whenever you like.
4. A tour of the interface
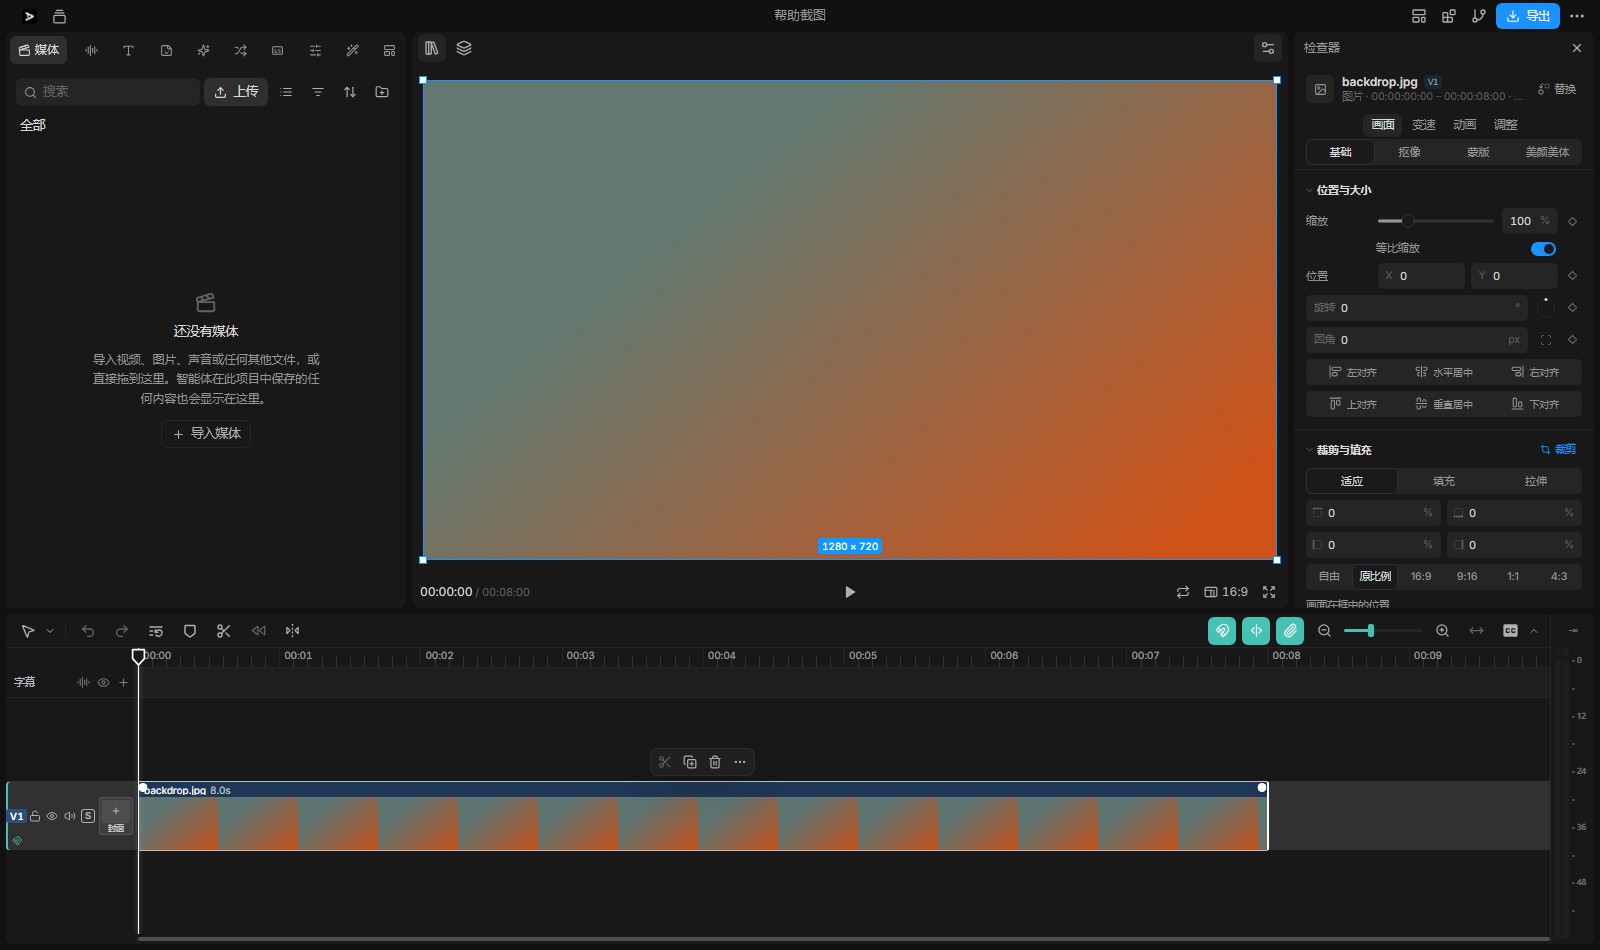
The top bar
From left to right:
| Where | What |
|---|---|
| The project's name | press to rename it |
| The AiCut mark | opens settings |
| The library icon | moves between projects |
| The update button | appears when there is a new version |
| Layout | four ready-made layouts (see section 16) |
| Panels | shows and hides media, layers, the timeline, the inspector, the AI chat |
| Version history | commits, branches, going back |
| Export (the solid button) | opens the export centre |
| More | open the project (show it in Finder / Explorer), rename, export, version history, delete |
A new version downloads in the background; Restart to update only appears once it is here, and Settings → About says how far the download has got. A download never starts over: a dropped connection, a closed laptop or a quit halfway through is picked up where it stopped on the next try, and the bar goes on from the percentage it had, with a line under it reading "continuing from {n}% of the last try". Only a file that fails its checksum, or a server that has swapped in another installer, throws the part away.
The six parts of the main area
| Panel | What it does |
|---|---|
| Media | on the left, ten tabs: media, audio, text, stickers, effects, transitions, subtitles, adjustment, filters, templates |
| Layers | what is on the picture at this moment, front to back |
| Preview | the picture. Pick, drag and retype things right in it |
| Inspector | on the right: every setting of the clip or element you picked — picture, sound, speed, animation, adjustment |
| Timeline | along the bottom, the tracks and clips |
| AI chat | on the desktop version, or a host that has a chat |
The preview's header has three small switches: media, layers, inspector. The divides between panels drag to change how wide they are, and a double press on a switch folds its panel away.
Each layout remembers its sizes
The sizes you drag are remembered per layout: raise the timeline in Editing and switch to Default and back, and it is still tall. To put a layout back as it started, use Restore this layout's default sizes at the foot of the Layout menu.
The interface style
Settings → General → Appearance → Interface style, one of four, and it changes on the press with no restart:
| Style | What it is like |
|---|---|
| Original | the way Studio has always looked, and what Pro interface returns to. Floating panels, a cyan highlight |
| Edit desk | a cutting room: panels flush into columns, one thin line between them, square corners, a bar along the top with the project's name, and every panel named with a ruler over it. It changes the layout, not only the colours |
| Paper | paper white and ink green, thin lines and room to breathe — quieter for long films |
| AI editing guide | the simplest one: two cards on the home page, choose a direction, a film in three steps. Amber on a charcoal stage, with the teal kept for what the picture gives back |
The style is about how things look — columns, corners, the accent; the theme under it (light / dark) is about light and dark, and the two do not touch: each of the four styles has both.
Edit desk is the only one that moves the structure. In the other styles five panels float on a dark board with six pixels between them; the edit desk drops the board, the panels sit flush together and against the window, with a single one-pixel line between two of them (a line that still drags to change the width). The project's name moves from the middle of the top to the left, after the mark; the viewer has a name for the first time (before, it only had a switch above it).
It also pulls the inspector into a full column: from under the top bar all the way to the bottom of the window, with the timeline ending at its left instead of running under it — so while cutting a long film the numbers in the inspector never scroll out of sight when the timeline gets taller. A row of tabs appears at the bottom: media, edit, deliver. They are not three different screens but three ways of arranging the same panels — media folds the timeline away to choose material, edit opens everything, deliver keeps only the picture so you can watch the film from end to end. (Export is still the button at the top right; the tabs have nothing to do with it.)
The track heads change too: a four-pixel colour bar down the left, in the colour of that track's clips (blue for picture, purple for sound, amber for word art), with the head's own background tinted the same; the numbers P1 / V1 / A1 are set in a monospaced face, like plates on a machine. Track heads are twenty-four pixels wider than in the other styles, so the names and switches have room. Thin lines on the timeline's toolbar separate the tools, the state and the switches, so you can find either end.
AI editing guide is the only one of the four that changes the home page: it opens on two cards — talking-head edit and general edit — pick one, then say what you have (no style / upload a video / give it a script), then pick a style (you can skip that), and the project is made. The other three keep the left column, Start a film and the grid of projects; the two never mix: changing the style changes the whole page.
A fresh install opens on this one, before you have chosen a style in settings: the first thing you see is those two cards, not a column of projects and a hundred styles. Along the bottom it says my projects and pro interface — the second goes back to the original interface, and that choice is remembered; a later update will not put you back on the start page.
Inside the editor it leaves the structure alone and only changes the tone: the background down to near black, cards with twelve-pixel corners and a thin grey line, a neutral grey for hovering, and amber only for what is moving — the playhead, the block in your hand, the main button you are pressing, the card you picked; the teal is kept for what the picture gives back (a render finished, a check passed), so the screen never turns into one wash of orange. In the timeline a page clip is amber and a video clip is cold slate: the two kinds of material read apart at a glance.
5. A few words
- Film: the
film.html, which is the whole project. - Track: one row of the timeline. The order is the picture's order — the first track is the top layer.
- Clip: one block on a track: a page, a video, a picture, a piece of sound.
- Cut: where two clips meet on the same track; a transition goes there.
- Overlay: text, stickers, effects, transition marks — blocks that do not take the main picture, usually on a row of their own.
- Adjustment layer: a transparent layer to hang filters on; it changes every track below it.
6. Playing and looking
| To | Do |
|---|---|
| Play / pause | Space or K |
| Backwards / play / faster again | J / K / L (up to 4×) |
| A frame at a time | hold K, then press J / L |
| One frame on | ← / → |
| Ten frames | ⇧ ← / ⇧ → |
| Jump to the previous / next cut | ↑ / ↓ |
| Jump to the start / the end | Home / End |
| Loop | ⇧ L (the range if there is one, otherwise the whole film) |
| Play from in to out | ⇧ Space |
| Full screen | the button at the preview's bottom right; inside, F leaves, K plays and pauses, M mutes, C subtitles |
The preview's bar also changes the picture's shape (original, 5.8-inch portrait, custom, from 1:4 to 4:1), the volume, the playback speed and whether subtitles show. Dragging the ruler drags the playhead.
7. Media
The media pool
Media → media on the left. It lists the files you brought in and the pages in the film, and not shelf material such as stickers or effects — those are on the tabs in section 11.
| Action | What happens |
|---|---|
| Drop files in / press upload | they go into assets/ |
| One press | selects it and shows it in the preview (see below) |
| Double press a folder | goes into it |
Enter | adds what is selected to the timeline at the playhead |
| Drag to the timeline | it lands where you let go; hold ⌥ while dragging to switch insert / overwrite |
| Drag onto a clip | a file from the media pane replaces that clip ("Replace video / Replace clip"); hold ⌥ for an ordinary landing |
⌘/Ctrl A | select all (with ⇧ and ⌘ to add) |
| Right press | rename, extract its sound as a new file, download, properties, delete |
Folders keep things tidy (drag a file onto a folder's icon), and the pool searches and sorts by name, time, length and kind. Deleting from the pool only takes it out of the pool: the file stays in the project's folder (it does not go to the bin, and is not deleted), and the clips that use it are removed from the timeline. To bring it back, import the same file with the same name and content, or rename it and import that.
Previewing a file
With a file selected the preview becomes that file's own player, with its own playhead:
Isets in,Osets out,Xclears them;,inserts that piece at the film's playhead,.overwrites at it;- the close button at the top right goes back to the film.
Proxies: a large file can carry a low-bitrate proxy, played while cutting while the export still uses the original (its properties say so).
8. The timeline: cutting
Picking and moving
Ais the select tool,Vis the select tool too,Bis the blade.- Press a clip to pick it;
⇧press or⌘press adds to the selection; drag on empty space to marquee. [/]select everything to the left / right of the playhead.- Drag a clip to move it; hold
⌥while dragging to leave a copy where you let go, with the original where it was. ⌥ ←/⌥ →nudge the picked clips a frame.Escdrops the selection.
Cutting and deleting
| To | Do |
|---|---|
| Cut at the playhead | ⌘ B (with nothing picked, cuts the clip on the target track) |
| Cut every unlocked track | ⌘ ⇧ B or ⌘ K |
| Delete | ⌫ / Delete |
| Ripple delete (what follows closes up) | ⇧ ⌫ |
| Ripple trim the start to the playhead | Q |
| Ripple trim the end to the playhead | W |
| Copy / cut / paste / duplicate | ⌘ C / ⌘ X / ⌘ V / ⌘ D |
| Copy a clip's properties | ⌘ ⇧ C (picture, sound, position and size, blend, volume, fades — choose) |
| Paste them onto other clips | ⌘ ⇧ V |
| Undo / redo | ⌘ Z / ⌘ ⇧ Z |
Mirror and reverse
Two more switches on the timeline's toolbar, acting on the picked clips:
| To | Do |
|---|---|
| Turn the picture left to right | pick the clip, press Mirror (again to undo) |
| Play the clip backwards | pick the clip, press Reverse (again to go forwards) |
- Both switches write the film's own attributes (
flip="h",reverse); not a byte of the material changes: the preview, the export, the HTML export and the command line all see the same thing. - A mirror turns about the picture's own centre: position, size and rotation stay.
- Reverse only works on things that have time: video and sound. A still is one picture; titles, stickers and effects draw their own frame at each moment and cannot run backwards — the button greys out.
- With several clips picked, a press changes every clip that can take it, and one undo puts them all back; clips on locked tracks stay.
- A reversed video steps back a frame at a time in the preview (browsers cannot play at a negative rate); the export hands
areverseto ffmpeg, and the sound's samples are read backwards with it.
Dragging an edge
- Drag a clip's left or right edge to trim that one piece.
- Drag where two clips meet to roll: one grows as the other shrinks, and the total stays the same.
- When the material runs out it says so plainly instead of quietly turning black.
While you drag, edges, cuts and the playhead pull (Snap, N), the main track has a magnet (P, also ⇧ N), and linked (~) decides whether a video and its sound move together.
With the magnet on, the main track is one continuous storyline: drop a clip onto a piece of it and it goes in there, the rest makes room, and the clip settles into the gap rather than floating over its neighbours; the main track keeps no holes — time freed by deleting, moving or trimming, and any hole that was already there, all close up when the clip lands.
Also in a clip's menu
Right press a clip: split at the playhead, ripple trim, freeze frame, separate the sound (⌃ ⇧ S), speed (⌘ R), copy / paste properties, relink the media (when a file has gone missing), delete.
To change the file a clip plays, drag one from Media → media onto the clip, or press Replace at the top right of the inspector and pick one of the files in the media pane. The replace list holds only what the pool shows: the pages the shelves wrote for stickers and effects are not in it.
When the new file is longer than the clip, the clip keeps its place and length and you pick which part of the file to use: dropping it on the clip (or picking it in the inspector's replace list) opens Replace first — the file above, a strip of its frames below. Drag the highlighted window along the strip (or press anywhere on it) to choose the part; the line under it follows: "Using 5.00s → 8.00s · of 10.00s". Keep the clip's effects is on by default, so the replacement carries the clip's grade, style and fades; turn it off and only the file changes. After 替换 the timeline says where the replacement landed and which part it uses. A file shorter than the clip makes the clip shorter, and says by how much.
Freeze frame takes the moment under the playhead, puts it in the pool as a still, and you can drag it onto the timeline as one.
9. The timeline: tracks, marks and views
Tracks
The strip down the left of each track is its head, from top to bottom:
- The track's name (you can rename it), lock, hide (no picture and no sound), mute (only its own sound), solo, and a level meter.
- Mute only makes the track inaudible: the film and the subtitles do not move — turn the original sound off and those lines stay where they were, burned into the exported picture just the same (only hide takes the track out of the film, and its subtitles with it).
- Solo: press to hear only this one;
⌥press to solo it alone. - Drag the bottom edge of a head to change the height (small / medium / large); double press to go back.
- The height can also be set for every track at once.
A track that holds nothing but transition pages folds into a thin line by itself (it should not take a row of picture); that is how it is meant to look.
Between two rows there is a one-pixel line, not a gap: a track is a piece of film laid against the next, not a stack of cards.
Smart cutting
Right press on a track head, or on empty space in a track, and the top four items are:
- Find the shots: it reads the picture of every file on that track and cuts where the shot changes — cuts only, deletes nothing. A single unbroken take gets told that no change was found.
- Cut the talking: it hears the pauses and takes them out, with the words after each one coming up (a little breath is kept either side of a pause, so no word gets bitten off). Picture and sound get shorter together.
- Rough cut: the same pass, harder — cut by shot, take out the pauses, drop the slivers of picture that flash between two pauses, and press what is left into one run. Easiest right after material lands on a track.
- Line up sound and picture: uses the sound to find the offset between this track and another (usually the main track) and moves the whole track by it. Two pieces with nothing in common are left alone, and it says so underneath.
Each of the four is one edit: ⌘Z puts it back in one step; locked tracks are left alone, and it says so. The analysis runs here on this computer with ffmpeg, so a long piece takes a few seconds the first time.
The cover
The small cell at the far right of the main track's head is the film's cover: the picture you picked, or nothing but a + when there is none, with cover written under it. It sits on the track head, tucked in front of the main track's own material — the film's own thing, on the film's own row.
- It is edited in the inspector: press the cell and the cover's editor takes the inspector's place — no dialog; press the cell again, or the × at the inspector's top right, and it folds away.
- The cover is drawn on the picture: with the editor open, the picture area shows the cover itself, whole, the size it saves at, instead of the film. Drag the image to reframe it (with the zoom slider), drag the words to move them; anything pushed past an edge stops at the edge.
- When the row is dragged very short the cell keeps only the word cover; the picture is not squeezed in.
- There is no cover by default: the cell is empty, and no frame of the film is used to fill it — a cover is there because a person picked one. (A card in the project list still draws the film's middle frame when there is no cover; that is the list's business, and the timeline does not count it as a cover.)
- To pick one yourself: drag the slider to a moment and press Use this frame — the whole film is drawn once as the export would draw it (a few seconds), kept in the project, and it stays the same whatever happens to the film later.
- Choose a picture… takes your own image (PNG / JPEG / WebP, up to 24 MB), keeps it as it is, and the list crops it to the card's shape.
- Words are dressed with the same controls a text clip has: family (the project's own fonts first in the menu), size, weight, italic, alignment, colour, line height, letter spacing, opacity, plus an outline (width, colour), a shadow (blur, colour) and a background behind the words (colour, padding) — each one a switch with its own few rows, as with subtitles and titles. Position has three quick cells: top / middle / bottom.
- The framing (16:9 / 9:16 / 1:1), zoom, brightness / contrast / saturation are in the same panel, and Save the cover draws the lot into one JPEG; when it is saved the editor stays open, the words are cleared, and the cell's picture changes on the spot.
- The × at the top right: when there is a cover there is a small × in the cell's corner, which deletes it there and then without opening the editor first; afterwards the cell is a + again, ready for another.
- You can also right press a clip and choose Set as cover: the frame under the playhead if the playhead is in that clip, otherwise the clip's middle frame (black at the start of a clip does not count) — the handiest way back after deleting a cover.
- Delete the cover at the foot of the panel does the same thing, and removes the file from the project.
Marks
Mputs a mark at the playhead; if a picked clip is under the playhead, the mark goes on that clip.⇧ Mis the next mark,⌥ ⇧ Mthe previous one (on a Mac⌥ Mis the previous).- Right press a mark to rename it, recolour it (blue, green, yellow, orange, red, purple) or delete it.
The view
⌘ +/⌘ -zoom in and out,⌘ 0goes back to the default,⇧ Zfits the whole film.⌘/Ctrlwith the wheel (or a pinch) zooms about the pointer;⇧with the wheel scrolls sideways.- The ruler drags out a playback range (or
I/Oset it), and the range is what loops or plays on its own. - The playhead is a flag on the ruler: hold it and drag along the ruler, and the time reads out beside it as you go. The range has a solid edge at each end, with a
[/]on the ruler, so you can see at a glance where it starts and ends.
10. The picture: changing it in the preview
You do not have to go to the inspector to change the picture; this is the easiest part of Studio.
Picking and transforming
- Press anything in the picture — a line of words, a picture, a shape — and it is picked.
- Drag to move; drag a corner handle to scale; drag the rotation handle to turn.
- The arrow keys nudge:
←→↑↓moves 1 px, with⇧10 px. (Press the picture once first so a frame appears around it — then the arrows move the element rather than the playhead.) - A locked element will not move; right press to unlock it.
Words
Double press words to retype them, Enter applies, Esc cancels. The right press menu has Edit text as well. With words picked, the inspector changes the size, weight, family (Latin / Chinese / Japanese / Korean groups, with a search), colour, line height, alignment, shadow, outline and the rest. A clip made from Text → default text shows its words on the timeline block (not a file name like text-k3f9a), and the block follows the words as you change them. With such a clip picked, the inspector opens on the Text tab: the words at the top, and under them the family, size, line height, letter spacing, alignment, plus bold / italic / underline, colour, and the same eighteen subtitle styles the subtitle panel has (the first cell, no style, takes every style back off — see section 14). These changes touch this one clip; not a byte of the page file in assets/ changes.
The right press menu
Align, lock / unlock, hide / show, duplicate, bring to front / send to back, select the parent, select the whole clip, reset the transform, reset the adjustment, copy the words.
Crop and mask
- Crop: go into it and drag the edges, choosing free or the original shape;
Enterfinishes,Esccancels. You can go back in and change it at any time. - Mask: add one in the inspector under Picture → Mask, then drag its position, size and rotation on the picture; drag outwards to feather it.
- Pen: picking Pen gives you no ready-made shape — you trace the region yourself: click the picture corner by corner, then press the first corner (or double-click, or
Enter) to close it, and only what you traced is kept.Backspacetakes the last corner back,Escgives the whole trace up and leaves the picture as it was. Trace again in the panel starts a new one.
Layers
The Layers panel on the right lists what is on the picture at this moment, front to back:
- Press a row to pick it; the eye hides it; the lock locks it; drag to change the order.
- Pressing a row lights it up in the picture; as the mouse moves over the picture the row lights up too.
- A row that says it is not on the picture is hidden at this moment, or has not come on yet.
11. The shelves: text, stickers, effects, transitions, filters, templates
Every tab of the media panel except media is a shelf. A card can be dragged onto a track, or pressed to add it.
| Tab | What is on it |
|---|---|
| Audio | this project's sound: music you brought in, sound lifted out of a clip, voices read aloud, grouped by the folders they are kept in — the first level across the top, the second down the side, as stickers are. Press to listen, drag to an audio track to use |
| Text | new text, mine, smart packaging, the word-art library (96, in 8 groups: popular / titles / variety / commerce / retro / cute / Chinese style / tech), text templates (42 word cards plus 5 film-title sets), smart text |
| Stickers | 59 in 6 groups; the last, motion, has 20 that move: pop in, hop, heartbeat, pulse, sway, swing, spin, float, shake, blink, flash, flame, jelly, orbit, flip, slide in, push in, rock, fall, wave |
| Effects | 100 in 11 groups: basic / light / mood / kinetic / cinematic / retro / nature / frames / gold dust / hearts / festival (each comes with a little fade in and out, changeable in the inspector) |
| Transitions | 6 basic transitions plus 48 drawn ones, in 6 groups: light / glitch / mask wipes / texture / nature / atmosphere (flash to white, light leak, glitch tear, tape, film burn, rain and snow and fog, petals, starlight, ribbons… the whole list is in the creative guide) |
| Subtitles | subtitle lines and subtitle styles (see section 14) |
| Adjustment | make an adjustment layer (press the card), bring in a LUT (.cube), and the looks you have saved under mine; the ten numbers themselves live in the inspector on the right |
| Filters | 113 looks in 14 groups |
| Templates | the same eight the start page's Templates has (same cover, same name): a press puts one at the playhead, and every layer of it can be changed |
Text templates are two things. On top are word cards — one card is a set of words already dressed: a starburst saying "look here!", square brackets around "the point is", a swing tag reading "best seller", a ribbon for "the final round"… A press puts the style and the words at the playhead; change the words and the style follows. They are grouped popular / titles / variety / commerce / tech. Under them are film titles (opening, chapter, quote, lower third, ending), which drop several pages of words at once, each page its own clip.
Word cards move, and hovering plays them
Every set of word art and every word card on the shelf carries an animation that runs on the timeline's clock (96 sets, 16 kinds of motion: a light sweep, neon flicker, glitch shake, bounce, a stamp coming down, jelly, floating, a cycling colour…). Rest the mouse on a card and it plays a moving preview right there — the same page that goes into the film — and moving away takes it away; one at a time. Once in the film it survives scrubbing: every second is that second's picture, and t=0 always has one. The variety group has the templates that feel like a variety show: scare, bullet comments, score up, clash, quiz, the crowd, spotlight, showdown, absurd, reaching the top, tears.
Bringing word cards in
The import button on the text templates or word-art library tab takes a .json file (see examples/word-cards.json). What comes in lands in a new mine group at the front of the shelf, with the same hover preview, and a × in the card's corner takes it away; the styles are kept in AiCut's home (~/.aicut), so every project can use them. How the fields are written, what gets refused, and how to have an AI make you a batch of cards (with prompts you can paste) are in the creative guide.
Once a sticker is on the picture, drag it there with the mouse to move it, drag a corner to scale, drag the dot above it to turn; its length changes by dragging the clip's edge on the track. To change position / size / rotation / opacity / colour / flip / shadow / length in one place, right press → edit sticker on the track, which opens a page of its own that lands on the film when you save. A double press does not open that page: a double press on the picture goes into that layer (as it does for a group), and a double press on the track does nothing.
Have the sticker follow something in the picture: with the sticker selected, the inspector shows a track section under position & size. Press motion track, then press once in the picture on the thing to follow (a moving person, car or square in the video): Studio works out its position frame by frame and writes the keys along the way into the sticker — played back, the sticker is pinned to it. Track options says how many keys were written; you can re-track or clear tracking at any time. Tracking needs a video under the sticker, played at its own speed (no speed change, no reverse); plane tracking (slopes, screens) is not in this version.
Where overlays land
Text, stickers, effects, filters and transitions each know where they belong: Studio reuses an empty track of the same kind first, and only adds a new one beside it when there is no room — so you never get a stray empty track with one line of words on it. An empty track is never reused for another kind.
Transitions
- Drag a transition onto the cut where two clips meet.
- A cut takes one transition; drag its edge to change the length; press
Deleteto take it off. - Too short a clip says it will not fit; with no cut nearby it tells you to put the playhead by one.
- Sound has a crossfade of its own.
A filter is an adjustment layer
Filters work in two ways:
- An adjustment layer (the better one): put it on an empty track above the picture and the layer's length is how long every track below it is changed. Good for one look across a whole film.
- Straight onto a clip.
The ten numbers of adjustment work the same way: the card in adjustment → custom adjustment does one thing — a press (the icon, the + in the corner and the label are all the same target) puts in an adjustment layer and picks it; with no clip picked it covers the whole film, with a clip picked it covers that one. There are no sliders in the pool: the ten numbers, the strength and the LUT strength are in the inspector on the right — a clip under adjustment, a layer under its adjustment layer section, the same controls either way (drag, type a number, double press to go back to zero, reset the whole thing).
Once it is in, choose the look in the inspector, with strength from 0 to 200%. The same filter chain never applies the same effect twice.
Bringing in a LUT (.cube)
Adjustment → bring in a LUT takes a .cube (3D or 1D — what Resolve, Premiere and CapCut write). Then:
- it lands on the picked clip, or on the picked adjustment layer (and so changes every track under that layer);
- it becomes a card under mine, named after the file, one press to put it on another clip; the card's tooltip has its fitting error against the original file;
- afterwards the inspector's LUT strength (the clip's at the top of its adjustment tab, a layer's under adjustment layer → strength) goes from 0 to 100, and the ten numbers still stack on top;
- save this adjustment at the top of the mine page keeps the numbers on the picked clip or layer as a card that comes back on one press.
A colour table (a 3D LUT) is a lookup, while a web page's filter can only be "a curve on each channel plus a matrix mixing the three", so the LUT is fitted to that shape: curve-shaped and matrix-shaped LUTs (nearly every look) show no difference, a few that lean on strong cross terms lose a couple of steps, and the error is on the card. The original .cube need not stay in the project — the numbers travel with the film, and the preview and the export draw the same one.
12. The inspector
With a clip picked (or an element picked in the picture) the inspector on the right has tabs, chosen by what the clip is:
| Tab | What is in it |
|---|---|
| Picture | position and size, rotation, opacity, blend mode, crop, mask, basic grading (brightness, contrast, saturation, hue), keying, beauty and body |
| Sound | volume, fades, pan, pitch, a three-band EQ, mute |
| Speed | two tabs: Speed sets the rate with a slider (0.25–4×), and the length under it works the other way round — type 4 s and the rate becomes what makes the clip 4 s long; the sound speeds with the picture and its pitch stays (to shift pitch, use Pitch in Sound takes). Curve makes the rate change along the clip (below). A clip placed by a rule has one more line here, decided by the rule "x" (see below) |
| Animation | an in-animation (slide up / down / left / right, grow, shrink), an out-animation, length, fade |
| Text | only on a text clip: the words, family, weight, size, line height, letter spacing, alignment, colour, and blend (opacity / blend mode), outline, background, glow, shadow, bend (see below) |
| Read aloud | only on a text clip: read the words on screen as a voice (see below) |
| Adjustment | the extra adjustment of this clip or layer |
The Keying tab has three: Smart cut-out cuts the person out through the whole clip in one click — a model on this machine answers every moment with a soft alpha, not a hard outline, so stray hair, a translucent sleeve or a motion-blurred hand keep a fading edge (no green screen, no network, and several people stay several people). A raised arm, a turned head or a step across the frame keeps its own shape instead of sliding one frame's outline around. It asks twelve times a second (fewer on a long clip, never under twice a second), and a short symmetric average across neighbouring frames stops the edge flickering or crawling as it plays; each moment's picture is decoded before it is worn, so the person no longer blinks out and back as the film plays; a moment the model cannot read holds its neighbour instead of punching a hole in the picture. The first cut-out is wearable at once and you can keep editing while the rest is cut out in the background (the button counts 12/240… with a progress bar below); the shape learns to change when the whole film is done. Cut out again runs the whole clip once more. Once cut out, Feather and Edge can be dragged straight away — one softens the edge, the other shrinks or grows it — and the picture follows the slider without another pass of the model. Brush keying is painted by hand, and the two work together; automatic keying reads a green or blue screen's colour. Pick an object asks a different model — twenty-one classes, so a cat, a dog, a bottle, a chair or a car can be clicked and cut out on its own; click the background and it says so, click a person and the sharper people model above takes the job. Anything outside those classes — something held in a hand, a product of your own — is not picked up, so paint it. Either way the result is editable without another pass of the model: paint outside the person and what it missed comes back, erase over the person and what it wrongly kept goes. Changing only the part it recognises as a face (bigger eyes) and makeup are still not here — make those in another tool and bring the result in.
A new project's video spec needs no setting up first: drop the first video or still onto the empty timeline (or press it to add), and the canvas takes its shape — the short side stays 1080, so a 1080 × 1920 phone clip or a 1080 × 1350 portrait photo makes a film of that size. The frame rate comes from that footage too, and the export's default resolution and rate follow both. Drop several files at once and the first picture in drop order whose size can be read decides. Once a picture is on the film the spec is settled: change it deliberately with the inspector's canvas ratio / W / H / frame rate, so a layout already made is not squeezed again. Sounds and captions are not pictures and claim no spec.
The inspector's header also has the frame rate (taken from the material); the timecode, the frame-by-frame moves and the export's default rate all follow it.
A position a rule decides
Some clips are not placed by a person but worked out by a rule: a rule says "this card comes on when the line reaches the word patience", and the position follows that word. Rules live in the project's .film/direction.json, usually written by an AI, and you can write them yourself.
A clip placed by a rule has one more line at the top of its Speed tab:
decided by the rule "patience-card" 0.45s earlier than the rule
Which is plain enough: the rule's arithmetic puts this card at 0.45 s, and it is at 0 s now. The rule does not act on its own — cut, retype a line, change a speed, and the place it works out changes, while the clip stays where it is until you decide. Opening the line gives four sentences: which word it is anchored to, how many seconds early, how long it lasts, and the window the rule works out; under them is line up with the rule, which moves the clip there, and one undo brings it back.
The rules' names and everything in them are in .film/direction.json. To pin a position and keep a rule off it, write "lock": true on that rule: the panel then shows a lock and only says where the rule wanted it, and stops suggesting a move.
When the file cannot be read Studio says so, rather than treating it as "no rules" — which would amount to treating every rule in the film as hand-placed.
Position and size (keyframes)
The top block of the Picture tab, one thing a row: scale (100% is the size that fills the picture; the picture grows and shrinks about its own centre, and does not move), keep the shape (turn it off and width W and height H appear, each on its own), position X / Y (the picture's top-left corner, in px), rotation (degrees — the little dial beside it drags too), corners (px); the bottom two rows align to the picture: left / centre / right, top / middle / bottom, every button saying what it does.
The diamond at the right of a row is its keyframe:
- Put the playhead at the moment in the clip where the change should start, and press that row's diamond — this moment's value is remembered and the diamond fills in.
- Move the playhead elsewhere and change that row's number — another keyframe is remembered by itself. Between two keyframes the value goes in a straight line.
- Stop on a filled diamond and press again to delete that keyframe for this moment; with every keyframe on the row gone, the row stops changing over time.
‹›beside the title step between keyframes, and↺clears the keyframes and the position together, all of it back with one undo.
Keyframes are kept row by row: with keyframes on position only, scale and rotation keep one value throughout. With keyframes on width alone or height alone, the other side follows the same proportion and the shape holds; write both and each goes its own way. Once corners have been keyframed, that field changes the keyframe's value rather than the clip's own CSS.
In film.html this is the clip's keys attribute, where t is seconds from the clip's start (not from the film's):
keys='[{"t":0,"x":100,"y":80},{"t":2,"x":700,"y":80}]'Straight between two points, and the last keyframe's value held after it.
Text (a text clip's Text tab)
Pick a text clip on a track and the inspector's first tab is Text: the words at the top, and how they are dressed under them.
- Words: what you type is what the picture says, written once when you leave the field (one undo takes the whole sentence back).
- Family: the family, the weight (the weights that family itself has), the size, line height, letter spacing, alignment, case, underline / strikethrough.
- Bold / italic / underline / colour: one row of buttons, one press each.
- Blend: opacity (0–100%), and how it sits on the picture (normal, multiply, screen, overlay…).
- Outline: a line around the letters, its colour and width.
- Background: a plate behind the letters — colour (which can be see-through), left and right / top and bottom padding, corners.
- Glow: a light around the letters, its colour and reach.
- Shadow: a drop shadow, X / Y offset, blur, colour.
- Bend: the words bend around a cylinder lying on its side, −60° to 60°, 0° being straight.
- Preset styles: the same eighteen styles the subtitle panel has (outline, capsule, black on gold, neon…), drawn the same way down to the punctuation: one letter "T" in that style, in front of you. The first cell is no style (a circle with a slash): a press takes every style this text has worn back off and returns it to what the page itself writes. A subtitle style is about how the letters look — the size and the position do not move — so a 4% subtitle outline on an 8.4% title keeps its width in step with the size.
Every block's title has a small button at its right: a + while it is not on (a press adds it with the values shown), and a ↺ once it is (a press takes it back to what the page itself writes). All of it lives in the clip's overrides; not a byte of the page file changes, so it can always be taken back.
Beauty and body
Pick a photo or video with a person in it and beauty and body in the Picture tab has three columns:
- Beauty · skin (eleven): smoothing, texture kept, whitening, evening out, fullness, spots and blemishes, shine, nasolabial lines, dark circles, clarity, feature sharpening.
- Beauty · face shape (fifteen): available once a face is found — ten that push the outline in at different heights (slim, bigger eyes, smooth contour, smaller face, narrow face, jawline, jawbone, cheekbones, V face, chin) and five that move a whole third of the face up or down (short face, upper / middle / lower face, hairline).
- Beauty · light and grain / complexion: clarity of light, lifting the shadows, soft light, grain, ruddiness, skin tone, saturation.
- Beauty presets: ten, each writing all sixteen numbers at once — natural, clear, refined, cream, dewy, cool white, matte, lively, studio, film.
- Body · shape: twelve sliders (0–100) — slimming, waist, bust, hips, shoulders, arms, thighs, calves, legs, torso, neck, head.
- Body · framing: high / centred / low, and where it sits across and down.
The eleven skin controls really do move pixels: smoothing lays a narrow blur down only where the picture is flat, so lashes, the line of the lips and the edge of the jaw stay as they were and a face does not turn into fogged glass. Texture kept puts the detail the smoothing took away back, and only on the skin — the wall, a shirt and the little blocks a codec leaves behind are never sharpened into fake pores (all the way down is a plastic face; back up and the skin has its pores again); spots, nasolabial lines and dark circles are one algorithm at different radii — lifting a small patch that is darker than its surroundings up to their brightness; shine does the reverse, pressing a patch brighter than its surroundings back down; whitening lifts only the midtones and leaves both ends, so nothing turns into a grey wash; fullness softens the light-to-dark transitions; clarity and feature sharpening put the edges back with a small kernel and a long radius.
Press find person first: once a face is found, the smoothing, the spots and the shine land on that face alone. Whitening is the one control that covers the whole frame — the face, the neck, the body, the clothes, the room and the lights are lifted together, so there is no line under the jaw and no need to find a person before using it. Until a face is found every slider treats the whole picture the same. Its curve leads with red (the bright channel gets the bigger gain), so lifting the whole frame does not wash the colour out into grey.
The twelve body sliders are measured off the joints when a whole figure is found: each pull is a share of that person's own width, so the background stays where it is. On a waist-up shot where only a face was found, the shoulders, waist and arms are estimated from it and those sliders still work; the leg sliders have little to move in such a frame. With nobody found at all, the first three fall back to the band approximation — edges pinned, the middle drawn in — and the background bends with it.
Beauty and body can be used together: one of each in the filter chain, and the reset button takes both off at once.
Read aloud (a text clip)
Pick a text clip on a track and a read aloud tab appears beside Animation:
- Voice: seventeen, grouped by language — Mandarin, Cantonese, Taiwanese Mandarin, English, Japanese, Korean. Xiaoxiao by default.
- Rate: −50% to +50%.
- Press read this text and the voice appears on a new audio track below, starting where the words start.
It uses Edge TTS (Microsoft Edge's online voices): free, no key, no sign-up — Settings → Providers shows it ready, as long as this machine is online. It reads the words on the picture now; if you have retyped them, that is what is read. What comes out is a sound clip of its own, not tied to the words — move it, change its length, delete the lot, and the words do not change by a byte.
13. Sound
- Every sound is a clip of its own: move it, trim it, copy it.
- Volume, fades (drag the handles above the clip;
⌥changes only this clip), pan, pitch (±12 semitones), a three-band EQ (dB). - The track head has a level meter; at 0 dB the sound is marked red for clipping, and a press clears it.
- Loudness: with clips picked, one press lines them up with a target for web video, podcast or broadcast (the menu names the LUFS); when it cannot be reached it says so.
- Separate the sound:
⌃ ⇧ Ssplits a video's sound into a clip of its own. - Sound to words: right press a clip or a track head and use sound to words to make subtitles from it (a transcription service has to be connected in settings first).
- Extract the sound: right press material in the pool to lift a video's sound out as a new file.
- Import a folder / link a folder: in the upload menu (on any page), Import files… is followed by Import a folder…, which copies the whole folder (its subfolders too) into this project and nowhere else. Link a folder… copies nothing: it leaves a link in the project pointing at the original folder. Linked on the sounds page, that folder is this project's alone — its sounds are this film's. Linked anywhere else, it also joins the sound library — the list the Studio server keeps, which the sounds page browses — but it is not linked into other projects any more: a sound is taken out of the library when one is used, not before. Undoing a link is done on the folder itself: right press it in the pool, or its category in the row at the top, and pick Remove link — only the link in this project goes (and the folder is taken off the shared library, if it was one of its own). The original folder and its files on your computer are untouched. The upload menu no longer carries a Remove a link… of its own: it lists only what brings media in. Remove from the shared library only takes it off the library and keeps this project's link.
- The sound library is a shelf: the folders added under Settings → Services → Shared sounds (a NAS, another disk) are what the sounds page lists. The page reads a catalogue and nothing else: the categories down the left are the library's own folders, 音效 and BGM across the top, and every card says the sound's name, the folder it is kept in and how long it is, with a star and a download arrow at its right. A library of three thousand sounds costs one catalogue — no sound is copied, linked or read into the project to draw it. A press on a card plays that sound (Studio sends its bytes a range at a time, as a server does); the arrow takes that one sound out: a copy kept in
~/.aicut/sound-cache/first (so using it again reads nothing from the library), then a copy of that in the project underassets/音效/<category>/(BGM underassets/music/<mood>/), put on the timeline at the playhead. Opening a project no longer links the whole library intoassets/; links an older project already has stay, and Remove link in the pool takes them away. - Grouped by folder: sounds kept in folders under
assets/get a row of categories at the top of the sounds page — the first level across, the number of sounds beside each; pick one and its own folders run down the left (as the sticker shelf's do) while the pane keeps only that branch. A pack that only wraps the library (no sounds of its own, nothing but categories inside) is stepped through, its categories taking the row. A search lets the row go: it looks through every folder. - Categories, stars, newest: the left of the shelf is the library's own folders for the section open (by name, with how many sounds each holds), and all / starred / newest sit above them — a star is kept in Studio once, so every project sees the same one, and newest reads the day each file was written, most recent first. The search box looks through the whole library, across sections and categories. A long name is cut off; the pointer says the whole of it.
- Background music: the library's
BGM/folder holds the moods (driving, quirky, playful, sad, celebratory, calm, epic) — that is the BGM section across the top, and the arrow files a track underassets/music/<mood>/.assets/musicalso tells the finished film that this is music — stem exports and subtitles never take a score for a voice. - When the catalogue is read again: a sound added, removed or renamed in a library folder is noticed the next time the sounds page is opened (every folder's mtime is kept with the catalogue); the ⟳ at the top reads everything again on the spot. A length is read the first time its card comes into view — the file's header only, one screenful at a time — and kept, so the next opening has it already; until then a card says
--:--. - The shelf keeps up with the disk: the catalogue lives in Studio's home and is checked against every library folder's mtime when the page opens, so a sound dropped into a category outside the editor shows up without a restart; the ⟳ at the top right reads the folders again on the spot. A library folder whose disk is off simply lists nothing — the rest of the shelf still works, and taking a sound out says which file could not be reached.
14. Subtitles
Making them
When the timeline holds voices that have not been transcribed, the subtitle button says so outright — "N clips with speech have no words yet" — and a press transcribes them.
Transcribing needs a speech service: Settings → Providers, for a cloud service, or local recognition (free, offline, with a model to download the first time). Local recognition has two rows, each on its own:
| Row | Model | Notes |
|---|---|---|
| SenseVoice Small | one 228 MB model | Mandarin, Cantonese, English, Japanese and Korean in one model; better than Whisper of the same size on Chinese and Cantonese. It runs on sherpa-onnx, not Whisper |
| Whisper (local) | Small / Medium / Large v3 | runs on whisper.cpp. For Chinese, medium at least: small drops characters and writes the wrong homophone |
Either way you download a model, press make this the transcriber, and from then on the subtitle button uses it — at no cost.
With nothing on this computer that can transcribe (no cloud service connected, no local model down yet), pressing sound to words or the subtitle button does not just report an error: settings opens on providers, the SenseVoice Small row outlined, the download button under the focus — Enter or Download, and it can transcribe.
Editing them
- Subtitles come from clips in the film: as long as the clip is in the film (its track not hidden), its file is in the project and it has words, it says its lines — whatever the volume. Mute a track, or set a clip to 0, and the subtitles stay where they are rather than disappearing.
- With the subtitle row open, subtitles show on the timeline as a row of their own: drag either end to change the time, split at the playhead, merge with the next, double press to retype.
- In bulk: marquee or
⌘ Ato pick them all, then delete them or shift their times together. - The style (family, size, colour, outline, position, number of lines) is under subtitles → style, and one change applies to the whole film.
- That panel is the same panel as the Text tab in a clip's inspector: the same groups in the same order (content → effects → type → colour → layout), the same rows and sliders. On the subtitles' side the content group holds the language and the lines, and the effects group the word highlight; a text clip has one group more, Blend (opacity, how it mixes). Learn it once and both work the same way.
- Preset styles at the top are ready-made cells (white with an outline, extra heavy outline, black bar, capsule, black on white, black on gold, white on red, white on blue, yellow, red, pink, cyan, green, neon… eighteen of them): a press changes the whole set, and every item can still be changed afterwards; change one and the cell stops being lit (it means "this is exactly that set"). The first cell is no style (a circle with a slash): it takes the outline, the shadow and the plate away and the words go back to white — the cell to press when you want no decoration at all. A text clip's text tab uses the same eighteen, drawn the same way.
- The media panel's subtitles tab has two items on the left: this film's subtitles — every line and its time, and a press takes the playhead there; subtitle templates — thirty prepared styles, grouped talking head / variety / film / plain / lyrics / English / big type / festival, searchable by name, group and tag. A card draws the film's own first line (or the template's own example when there are no subtitles yet), so a row of them changes in style rather than in words; a word-by-word template even draws which word is being said. A template carries more than the inspector's presets: the size, weight, letter spacing, English capitals and the word-by-word highlight — the whole look of the type, not only its outline. A press puts it on every subtitle in the film (the words only; position and the on switch do not move), and the one applied gets a blue frame; restore the default under the search box takes it back.
Cin the preview turns subtitles on and off.
A subtitle can only merge with the next one from the same voice; no sound at the playhead, or no room there, and it tells you why.
15. Version history
Studio keeps a folder's history with git, so you can go back to any version at any time.
| Action | What it does |
|---|---|
| Commit | keeps the film as it is now as a version; you have to say what this version is |
| Restore this version | the film goes back to that version, and comes back as uncommitted changes: commit to keep it, discard to stay as you are |
| New branch | starts a branch here (or from a version), and uncommitted changes come with it |
| Merge | brings a branch into the current one; where both changed the same place it asks which side to keep |
| Discard the changes | goes back to the last commit, and files added since go to the bin |
The history takes only the files the film really uses — unused material does not take up room in it, and the panel says how many are in and how many are not. Deleting a branch warns you when some of its versions exist nowhere else; once confirmed, those versions are gone.
16. Layouts and workspaces
The Layout menu at the top has four:
| Layout | For |
|---|---|
| Default | media, picture, inspector, timeline, each in its place |
| Portrait | the player moves to the far left, media beside it, the timeline shorter: a portrait picture fills the height |
| Editing | wider media, a taller timeline — easier with many tracks |
| AI | media folded away, the chat along the right, making and adjusting side by side |
- Panel sizes are remembered per layout (see section 4).
- The Panels menu shows and hides media, layers, the timeline, the inspector and the AI chat one at a time.
- In the portrait layout the timeline drops under the media column on purpose: a portrait picture needs the height.
17. The AI chat
The desktop version (or a host that has a chat) has the chat window on the right, working on this one film.
- Say something and it does it: add a shot, rewrite the copy, change the palette, cut to the beat.
- Stop interrupts at any time; new chat starts another thread.
- When the agent needs to run a command or change a file it asks permission, and you can allow or refuse it; it also asks questions, and goes on when you answer. The choices can carry pictures: for a visual style it lays out three real covers as three cards, and a press is the answer.
- Quote: pick a clip (or a region in the picture) and press
⌘/Ctrl Lto send it as context. By default it knows where you are looking. - Make a video: there is an entry in the chat's input — choose a model, write what it is, set the length and shape, name a first frame if you like; what comes out lands in the media pool, or goes straight to the playhead. Your own service bills by use, and it asks once more before make.
/commands: type/in the input and it lists the commands this agent has. With your own agent (Claude Code, Codex and the like) these are its own built-ins, skills and custom commands; with AiCut's built-in model it is/compact, which presses the conversation so far into a summary — add a line after it to say what to keep (/compact keep the shot list), so a long chat does not grow past what the service will take. An unknown/xxxis sent to the agent as ordinary text rather than refused.- Project skills: put a
.pi/skills/<name>/SKILL.md(or.agents/skills/…) in the project's folder and the built-in model sees its name and what it is for, reading the whole file only when the task matches. The file starts withnameanddescription, and the description says when to use it. Only this project's and AiCut's own are read (see the next item): skills elsewhere on this machine are not used — what was written elsewhere need not agree with AiCut's ownaicut, and what is in a project you can open and read at any time. With your own agent, skills stay that agent's business. - How a skill gets into a project: new asks neither a name nor a skill — one press and you are in the editor. To have a project carry a skill, switch it on as a style card on the skills page, then take its card from your styles at the top of the style library page: the project comes with a
.pi/skills/<skill>/already in it, the project's chat can use it, and it travels with the folder to another machine or another person. The starting film on that card is real too: there is a picture as soon as it opens, ready to change. - Built-in skills: AiCut ships two, no installing.
aicutis the format manual (film.html,window.film.frame(t), the four commands, the hard rules);aicut-motionis the art director: say "make it move", "cut a launch film", "turn this data into animation", and the built-in model follows it — writing down every number in what you said (length, palette, type, copy, beat, what is forbidden), settling a design contract, laying the timeline on the beat, then writing the page, and finally looking at whatlookdraws and judging it before handing it over. Seven design systems sit in itsreferences/design-systems/(engineering blueprint, Swiss motion, ink wash, data dashboard, heavy poster, halftone print, picture-book scene); the style is still whatever your prompt says, and they are only a starting point when it says nothing. - The 86 styles are skills too: the skills page lays the 86 out as the same wall of covers the style library has — the archive number top left, the Chinese name and its family below, a family filter above, a search that knows both names and numbers. A press turns one into a style card in your styles at the top of the style library; another press takes the card away and leaves the skill. Each skill is whole on its own: its original cover (
poster.webp), the source that draws it (reference/code.js), its palette, and what it does not do — so a single style can be handed to another agent to follow. - 86 visual styles: the archive is in
aicut-motiontoo (assets/atlas/) — 86 visual styles that really existed, each with its original cover (800×450, the one you see when choosing), one line on what it is, one on how it moves, and the canvas source that drew it (draw(ctx, W, H, t), time only, no network, never executed). Given a subject and no style, it first picks three from the archive — by how they explain rather than by colour: one drawn (whiteboard, isometric, circuit), one made of material (watercolour, cut paper, clay), one made of data (newspaper chart, halftone, …) — lays their original covers out as three cards, and only when you say which does it read that one's source and carry the method into the film'sframe(t), making a sample of about twenty seconds first and writing the whole film only once the sample passes. An installed skill lives in the agent's own skill folder (~/.aicut/agents/skills/aicut-motion), so any project and any chat can use it by subject alone, with no copying into the project; you only open it on the skills page to have it as a style card and start from the card.
18. Export
The solid Export button at the top right opens the export centre: choose the format and the range, queue it up, and ffmpeg on this computer does the rest.
- Quality: standard / high / master.
- Sound in a web page: browsers do not let a page make noise as soon as it opens, so press the picture once (or press
M) and it sounds; the ♪ at the top right mutes it too. Page after page picks up each page's own sound at that page's own second. - Shape: original, fit with bars, fill and crop. When the picture's shape does not match the platform the bars go on by default, and your content is never cropped away.
- Codecs:
| Codec | For |
|---|---|
| H.264 | plays everywhere, the safest |
| HEVC | about 40% smaller at the same quality, newer devices |
| VP9 | WebM with transparency, for the web |
| ProRes 422 HQ | a cutting master, for Premiere / Final Cut / Resolve |
| ProRes 4444 | with transparency, compositing, After Effects |
| A PNG sequence | one PNG with alpha per frame, 3D and game engines |
| HEVC Alpha | transparent video that Apple's own players take |
- Range: the whole film, or from one time to another.
- Subtitles: burned into the picture, or exported as a subtitle file alone, or neither. Vertical feeds burn them by default, because most people watch with the sound off.
- Sound: with an audio track or without.
- Cover: include the cover beside sound on the video file page puts the cover's picture in the same folder as the video, with the video's name and
-cover.jpgat the end (upload that when a platform asks for a thumbnail). The item is grey until a cover has been picked on the timeline — go and pick one. - GIF: a short range; ten seconds at 640 px is usually a few MB.
The export queue
Several exports can be queued at once; the foot of the window shows each one's stage (getting ready / mixing / rendering / encoding / finishing / copying), the time left, and a way to cancel. When one is done you can open the file, or show it in Finder / Explorer.
The rendering happens on this computer with ffmpeg; nothing is uploaded.
Why an export can fail
| It says | What to do |
|---|---|
| the film cannot be drawn | fix the error the preview reports first; a picture that draws is a picture that exports |
| N media files are missing | right press the red clip on the timeline and relink it |
| the film is empty | put at least one clip in it |
| the local engine is not answering | restart AiCut |
| the ffmpeg on this computer cannot make this format | change the codec, or use another ffmpeg build |
| a transparent export came out opaque | something draws a full-screen background of its own; move that background onto a clip of its own |
19. Settings
Open it with the AiCut mark at the top left. Groups down the left, and a search at the top.
| Group | What is in it |
|---|---|
| General | the interface language, and the basics |
| Agent (desktop) | which agent, its model, how hard it thinks, its API key |
| Video models | the services used to generate video |
| Providers | where voice-over, music, effects, transcripts, pictures and video come from; put your own key in here, or download a local recognition model (SenseVoice Small, Whisper (local)) |
| Models | which model each job uses by default |
| Keys | every key (section 20) |
| Developer | every round's changes and the logs, and a preview of what an update brings |
A few things:
- No service at all is needed to make, cut and render a film; only generating needs one.
- Keys are kept on this computer and sent only to the service they belong to.
- A model that has to see pictures (the agent checks the frames it made) must take images.
- Both local recognition rows download the recogniser along with the model the first time; the progress shows on the row straight away, and a failure says why there too.
- SenseVoice Small is the least trouble for Mandarin and Cantonese; for Whisper on Chinese, medium or above.
20. Every key
Keys follow the system: ⌘ on a Mac, Ctrl elsewhere. While you are typing, the playback and editing keys pause. Once the picture has been pressed, the arrow keys move the element picked in it.
Playing
| Key | What it does |
|---|---|
Space | play / pause |
J K L | backwards / stop / play (press again to go faster) |
hold K + J / L | one frame back / on |
← → | the playhead one frame |
⇧ ← ⇧ → | the playhead ten frames |
↑ ↓ | the previous / next cut |
Home End | the start / the end |
In, out and marks
| Key | What it does |
|---|---|
I O | set in / out |
X / ⌥ X | clear in and out |
⇧ X | in and out from the picked clips |
⇧ I ⇧ O | go to the in / the out |
⇧ Space | play from in to out |
⇧ L | loop |
, . | previewing a file: insert / overwrite at the playhead |
Enter | add the picked material to the timeline |
M | add a mark |
⇧ M / ⌥ ⇧ M | the next / the previous mark |
Timeline and editing
| Key | What it does |
|---|---|
⌘ Z / ⌘ ⇧ Z | undo / redo |
⌘ B | cut the picked clips at the playhead |
⌘ ⇧ B or ⌘ K | cut every unlocked track |
Q / W | ripple trim the start / the end to the playhead |
⌘ C ⌘ X ⌘ V ⌘ D | copy / cut / paste / duplicate |
⌘ ⇧ C / ⌘ ⇧ V | copy / paste properties |
⌘ R | speed |
⌃ ⇧ S | separate a video's sound |
⌫ / Delete | delete |
⇧ ⌫ | ripple delete and close the gap |
⌥ ← / ⌥ → | nudge the clips a frame |
⌘ A | pick the unlocked clips (press the timeline first) |
[ ] | everything to the left / the right |
Esc | drop the selection |
A V | the select tool |
B | the blade (⇧ press: cut every track here) |
P / ⇧ N | the main track's magnet |
N | snapping |
~ | linked |
hold ⌥ while dragging a clip | leaves a copy |
hold ⌥ while dragging a clip (insert / overwrite) | held as it lands: insert becomes overwrite, or the other way |
The timeline's view
| Key | What it does |
|---|---|
⌘ = / ⌘ + | zoom in |
⌘ - | zoom out |
⌘ 0 | reset the zoom |
⇧ Z | fit the whole film |
Elements in the picture
| Key | What it does |
|---|---|
←→↑↓ | move the picked element 1 px |
⇧ with the arrows | 10 px |
Enter | edit the picked text / apply the edit |
Esc | leave the text / drop the selection |
Full screen
| Key | What it does |
|---|---|
K | play / pause |
M | mute |
C | subtitles |
F | leave full screen |
21. The command line
The commands are run by the agent, and you can run them yourself: npx -y @autoaiai/aicut@latest <command>, or install with npm i -g @autoaiai/aicut first. The package is @autoaiai/aicut and the command is aicut — two different names, and there is no bare package called aicut (npm i -g aicut and npx aicut both 404); to have npm install it under that name: npm i -g aicut@npm:@autoaiai/aicut.
| Command | What it does | |
|---|---|---|
aicut | prints the manual an agent reads | |
| `aicut open [folder \ | url]` | opens a film in Studio: a new one, one that exists, one from GitHub, this folder, or the last one |
| `aicut look [what] [t \ | a-b]` | looks at a film, a page or a media file: a sheet of thumbnails, one frame, or a range |
aicut render [a-b] | renders an MP4; --4k, --blur (motion blur), --alpha (.webm / .mov) | |
aicut get [what] | generates voice-over, music, effects, transcripts, pictures and video through your own services |
aicut <command> --help shows every option a command has.
A film opened by aicut open appears in the browser by itself: an agent usually has no browser, so the command does it and prints the address. A Studio page already open switches to that project. To keep any browser from opening (servers, screen recording, CI), set AICUT_NO_BROWSER=1 and only the address is printed.
22. When something is wrong
The preview is empty / "the preview cannot be drawn" Look at the film's page first: Studio reports the page's errors, fonts that failed to load, sound that is missing and words the picture's edge cuts off. aicut look checks all of it in one go.
"Media missing: xxx — right press the clip to relink it" The file was moved, renamed or deleted. Right press the red clip → relink → choose the file. When several clips use the same file, one relink fixes them all.
"A change made outside Studio undid N of your edits" The agent saved film.html while you were editing, and the changes you had not written yet were overwritten. Press bring them back to keep them, or do not to let them go.
An edit did not reach the film When the page itself cannot be read, Studio says outright that it cannot read film.html at the moment and is showing the last good version — edits made then are not saved. Fix it, or have the agent fix it.
An export sits at getting ready / the engine does not answer Restart AiCut. ffmpeg usually needs no attention: the desktop installer carries one, and the browser and command-line versions fetch their own into ~/.aicut/runtime/ on first run (an installed desktop version lends its copy). When GitHub cannot be reached, point AICUT_FFMPEG_MIRROR at the same download.
Making subtitles does nothing
- "There is no speech here to transcribe": it has been transcribed already, or it is not speech.
- "Making subtitles needs a speech service": connect one in Settings → Providers.
- Transcription failed in the cloud: check the key and the balance.
Renaming or deleting a project says "that folder is in use" The project's chat or an export still has it open, or the agent is running inside it. Stop that first.
A button does nothing in the desktop version If you are changing AiCut's own code, check that the capability is allowed in the desktop's permission list (clipboard, full screen and so on).
23. What a film's folder looks like
my film/
├── film.html          ← the whole film: tracks, clips, times, styles
├── assets/            ← video, pictures, sound, and what the pages load
└── .film/             ← Studio's own: caches, version history (git), the project's id
                          direction.json (rules: which line of words places a clip)
                          ledger.json (the ledger: what each generated thing was made from)
Most of .film/ is Studio's own and does not travel in git; direction.json and ledger.json are the exceptions — they record how this film was made, so they travel with the folder and are still there when it is copied to another computer.
Each <section> in film.html is a track, the first at the top; an element is a clip:
<section>
  <iframe src="title.html#t=0,4"></iframe>
</section>
<section>
  <video src="assets/footage.mp4#t=12,18" at="4" class="card"></video>
</section>
<section>
  <audio src="assets/music.mp3" volume="0.6"></audio>
</section>
A page is a web page that can draw itself at any moment:
<script type="module">
window.film = {
  frame(t) { /* draw the whole picture at second t */ },
  duration: 4,
  ready: loadFonts(),
};
</script>
The one rule: the same t always draws the same picture, whatever was drawn before. A render asks for frames out of order and in parallel, and a page that keeps this rule draws the same at any size and on any computer.
To have an agent change a film, hand it the whole folder — it reads the same files, it sees your changes, and you see its changes in Studio and can undo them.
Questions, ideas, or work to show? The Discussions are the place. A bug belongs in an Issue.